How to verify and clean up your ActiveCampaign email list?

Technical Content Marketer

Reviewed by Onar Alili
Co-founder & Engineer
Updated Published 5 min read

Keeping your email list clean is essential for good deliverability, lower bounce rates, and accurate engagement metrics. oopspam now offers a direct ActiveCampaign integration that lets you scan your contacts for suspicious or risky email addresses, and remove them in just a few clicks.
Here’s how to get started.
Step 1: Go to the Integrations Page
From your oopspam Dashboard, click Integrations in the left sidebar. You’ll see the ActiveCampaign integration card. Click Connect to begin.

Step 2: Enter Your ActiveCampaign Credentials
A dialog will appear asking for two things:
- Account URL — your ActiveCampaign account URL (you can also find this in Settings → Developer, along with your API details)
- API Token — find this under Settings → Developer in your ActiveCampaign account
Enter both fields and click Connect.

Step 3: Select an Email List
Once connected, oopspam will fetch your email lists from ActiveCampaign. Select the list you want to scan.

Step 4: Review Contacts and Start Scanning
You’ll see a preview of the contacts in your selected list. oopspam checks each email address against its spam database to identify risky addresses.
Click Scan All Emails to start the scan. Note: scanning uses your oopspam API credits.

Step 5: Turn on Additional Risk Criteria
Before clicking that button, it’s worth glancing at the Additional risk criteria section on the same screen. Two checkboxes here let oopspam catch things a standard scan wouldn’t:
- Flag contacts that have soft bounced - picks out addresses that already failed to deliver on a recent send.
- Flag contacts that never opened the last 3 emails - picks out subscribers who’ve gone cold. This requires open tracking to be turned on in ActiveCampaign, and the option itself flags that results can be unreliable without it.

Both checks add extra work per contact, so turning them on will stretch out how long the scan takes.
Step 6: Apply IP-Based Filters
Underneath, an IP-based filters section shows up whenever ActiveCampaign passes subscriber IP data along to oopspam. It gives you a few extra dials:
- Block VPN / Proxy / Tor IPs
- Block data center IPs
- Allowed countries and Blocked countries to keep results focused on, or away from, particular regions.

As with the risk criteria, enabling these filters adds a bit more time to the scan.
Step 7: Walk Away While It Scans
Scans no longer require you to sit and wait. Once you click Scan All Emails, everything happens in the background, and oopspam emails you as soon as it’s done.

If you want to check sooner, open Integrations → Scan Jobs. It shows each scan’s current state (Running, Completed, or Cancelled) plus a running tally of emails scanned and risky contacts found.

Step 8: Review Scan Results and Take Action
After scanning, oopspam shows a breakdown of your results:
- Total Scanned - total number of emails checked
- Clean - emails that passed and are safe to keep
- Risky - suspicious emails you should act on
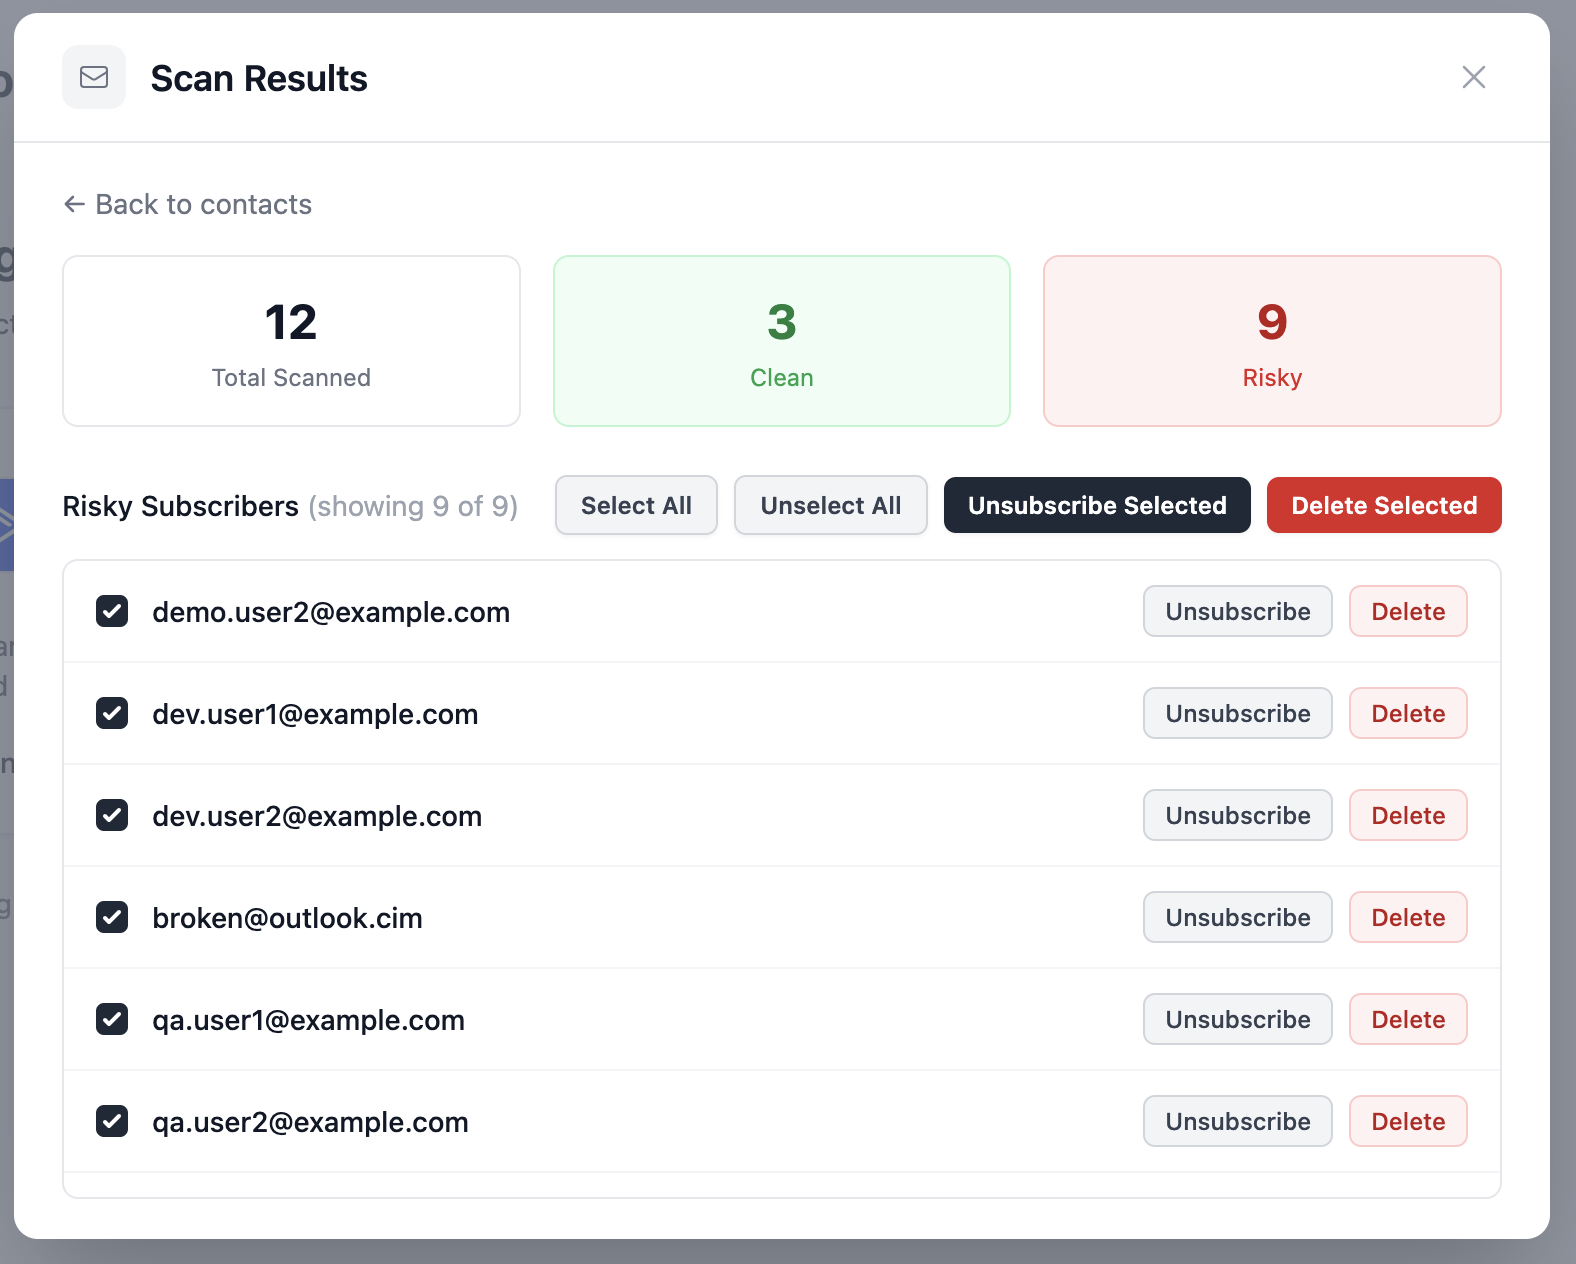
All risky subscribers are listed with individual action buttons. You have two options for each contact:
- Unsubscribe - removes the contact from the selected list, but keeps them in your ActiveCampaign account
- Delete - permanently removes the contact from your entire ActiveCampaign account
You can also use the bulk action buttons at the top:
- Unsubscribe Selected - unsubscribes all checked contacts from the list
- Delete Selected - permanently deletes all checked contacts from your account
Use Select All to check all risky contacts at once, or select them individually.
Step 6: Done! Your List Is Clean
Once you’ve taken action, the risky count drops to 0 and you’ll see a confirmation message showing how many contacts were unsubscribed or deleted.

Why Clean Your Email List?
Cleaning your email list improves deliverability by reducing bounce rates and helping email providers trust your sender reputation. It also ensures more accurate metrics, so your open and click rates reflect real engagement.
By removing inactive or risky contacts, you can lower costs since most platforms charge per subscriber, while also avoiding spam traps that could get your domain blocklisted.
With oopspam’s ActiveCampaign integration, the entire process is quick and simple. No exports, no CSVs, no manual work. Connect once, scan anytime.