
Onar Alili
Engineer
9 minutes to read
Stop spam on Netlify Forms using Zapier and OOPSpam
- Intro
- Capturing Netlify form submissions
- Setting up OOPSpam for spam detection
- Filtering with Filter
- Send an email to yourself with Email by Zapier
- Configure form submission notifications in Netlify
- Final thoughts
Intro
Netlify is a leading website deployment platform known for its ability to deliver highly scalable websites. It simplifies the build process and makes it possible to deploy websites quickly.
In this article we will focus on Netlify Forms and its anti-spam features. It is easy to set up Netlify Forms, all you need to do is add its ``netlify’’ attribute to an HTML form and it will automatically collect all form data.
By default, all forms are filtered by Akismet. After the submissions go through the spam filter, they are categorized into two lists: not spam entries under Verified Submissions and spam entries under Spam Submissions. Years ago, I had a simple website hosted on Netlify with a form, so I decided to check Verified Submissions. To my surprise, I noticed a lot of obvious spam submissions going through. Here are a few of them:

but it also did a good job of catching a lot of them:

In addition to Akismet, Netlify Forms also supports the reCAPTCHA and honeypot fields. We previously talked about how the honeypot technique prevents bots from spamming your forms. Although it’s less effective now, it still works to some extent. The hidden honeypot field will not be visible to humans, but bots will consider it a valid field. Bots scan web pages and fill in all fields, including the hidden field in your form. Netlify Forms will reject any submission that contains an entry in a hidden field.
However, reCAPTCHA and other CAPTCHA solutions are becoming irrelevant due to the availability of low-cost services to solve them.
If you are still getting spam with the options available to you through Netlify, this article will look at an alternative solution to prevent spam submissions to Netlify contact forms. The approach is to use automation tools such as Zapier or Make to capture form submissions, then filter them through a spam filter (using OOPSpam) before finally sending an email notification to yourself.
I’ll be using Zapier for this tutorial, but you can do this with Make or any other automation platforms.
If you wish to skip the steps below, use the template we created for a quick start:
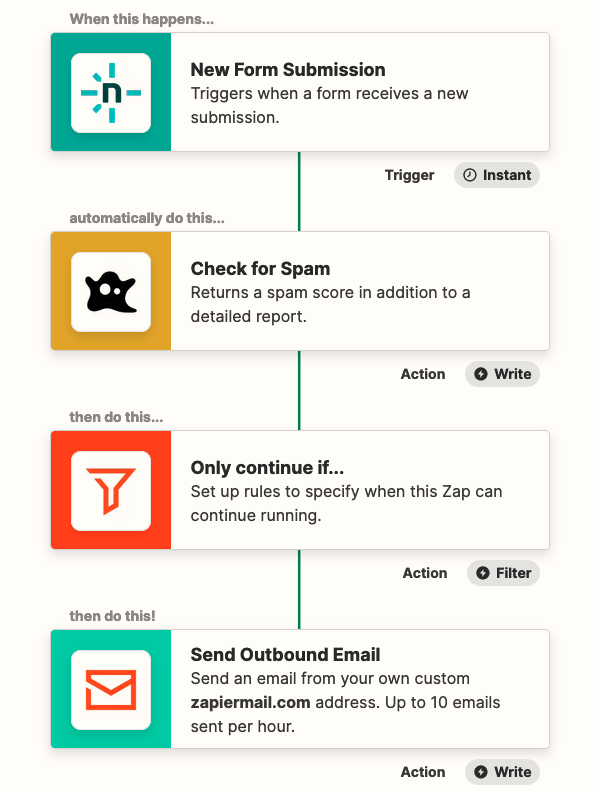
Zapier will walk you through the configuration for all 4 steps: Netlify -> Spam check with OOPSpam -> Filter -> Email by Zapier.
Filter should be configured by default. The filter is simple with only one rule: Continue processing only if spam score is less than 3.
Capturing Netlify form submissions
Our goal is to build a simple automation flow where it checks every form submission with OOPSpam and sends an email to us.

- First, add Netlify zap to your flow and under Event, select New Form Submission. Connect your Netlify account so that it can retrieve available forms from your account.
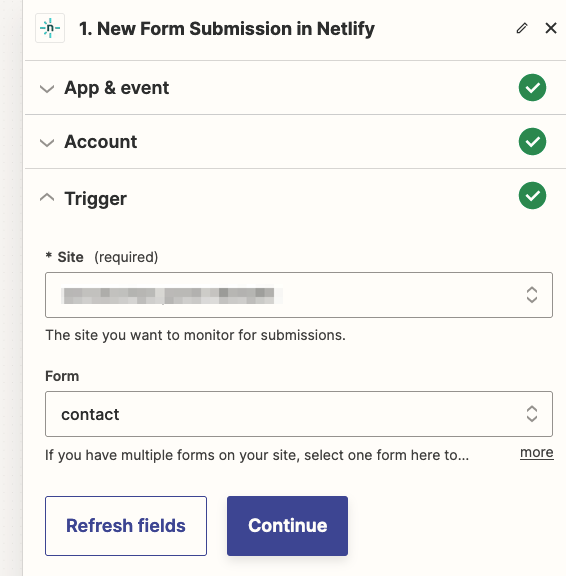
- Under Trigger, select your Site and Form and click Continue.
- In the Test step, your last 3 form submissions will be populated. So make sure you have submitted some test form.
Setting up OOPSpam for spam detection
To set up spam filtering in your Zapier flow, follow these steps:
- Register for an API key on the OOPSpam Dashboard.
- Add the OOPSpam Zap to your flow
- Under OOPSpam’s Event select Check for spam
- To connect your OOPSpam account, enter the API key when prompted on the Choose Account step.
-
Map the necessary form information to OOPSpam’s fields:
- Content: This is where the form message goes. Usually called Data Message.
- Sender IP: This is where the IP of the form submitter goes. Usually called Data Ip.
- Email: This is where the form submitter’s email goes. Usually called Data Email.
- Language Allowlist: Select any languages you expect to receive form submissions in.
- Allow messages only from these countries: Filter submissions by country.
- Block messages from these countries: Block by country.
- Test the action. We will use the “score” returned by OOPSpam to approve or reject submissions with Filter Zapier in the next step.

Filtering with Filter
The “Filter” app in Zapier sets conditions for your automation flow to continue.
In this case, the condition is that the “Score” (or Spam Score) must be less than 3. This ensures that only emails with a low spam score pass through.

Alternative approach: Storing spam submissions in Airtable
Instead of using the Filter app, you can use the Paths app to take different actions depending on whether the submission is considered spam or not. Here’s an example:
- Path A [Not spam]: If the Score is less than 3, then send an email.
- Path B [Spam]: If the Score is greater than 2, then create a record in Airtable to store the spam submission for later review.
This alternative approach stores all spam submissions in Airtable for future analysis. You can use another platform such as Google Sheets if you prefer.
It’s important to note that scores of 3 or higher should be considered spam, while scores below 3 should be considered non-spam.

Send an email to yourself with Email by Zapier
The final step is to set up the Send Outbound Email to notify yourself of new submissions. Depending on your use case, you could also use Slack or another type of notification.

To send the email, you will need to map the required fields to the data from the Netlify contact form submissions. The required fields are:
- To: Your email address (up to 5 emails can be added).
- Subject: The name of the form.
- Body: The email body can be in HTML or plain text. In the example, the data points (email, name, message fields) are separated by line breaks using the <p> HTML tag.
- Reply To (optional): This field is not required, but it makes responding to emails more convenient. The sender’s email can be added here so that you can simply click the “Reply” button in your email client if you wish to respond to the submission.
Once you have the email set up, test it to see if you receive the first submission. You can also use other email services like Postmark or Mailgun instead of Email by Zapier.
Configure form submission notifications in Netlify
By default, Netlify sends an email for each verified submission. We need to disable this as we are already sending an email notification to ourselves in our automation. In your website settings on Netlify, go to Site Configuration -> Notifications -> Emails and Webhooks, under Form Submission Notifications, delete the email notifications.

For websites using embedded contact or lead forms, you can also add spam protection to embedded forms using OOPSpam and Zapier to reduce spam automatically.
Final thoughts
This was a basic workflow for filtering spam in your Netlify forms using Zapier and OOPSpam. You can also use other platforms to automate this process. You can also add additional steps and conditions to make it more complex, such as sending an automated email response to the visitor confirming successful submission.
