
Chazie Baniquid
Technical Content Marketer
7 minutes to read
How to Limit Form Submissions in Piotnet Forms

Piotnet Forms does not include built-in submission throttling or country blocking. It does, however, offer tools for managing who can view or complete your form. This reduces unwanted submissions at the source.
You can set age limits, schedule visibility, and restrict access based on role, URL structure, or custom fields. These features shape how people interact with your form before they ever submit. For real spam filtering and rate limiting, use OOPSpam.
This guide explains every option you can use to limit Piotnet Forms submissions, including built-in rules, visibility settings, Piotnet Addons for Elementor (PAFE) entry caps, and advanced spam filtering.
1. Set Age Limits With Conditional Logic
Piotnet Forms allows you to show or hide elements based on a user’s age. This is the simplest way to enforce age requirements or filter job applicants by age range.

How to Set an Age Limit
- Add an Age field (Number or calculated from Date of Birth).
- Edit the element you want to control.
- Go to Advanced → Conditional Visibility.
- Create a rule:
[field id="age"] < 18 - Set Action: Hide for the Submit button or any form section.
This blocks minors from submitting forms, and can also hide or show different options based on age brackets.
Practical uses
- Minimum age: 18+
- Job applications: allow 16–40 only
- Age-based services: show different plans for teens, adults, and seniors
2. Control Form Access With Conditional Visibility
This feature determines who sees the form, when the form appears, and under what rules it becomes available. Visibility settings help you prevent incorrect submissions before they start.
User Role Visibility

Show or hide the form for:
- Logged-in users only
- Specific roles (Admin, Editor, Author, Subscriber)
- Non-logged-in visitors
This is useful when you want only registered users or internal team members to submit.
Date and Time Visibility

Schedule your form:
- Show before a deadline
- Hide after closing date
- Display only during business hours
Piotnet uses your server time zone. Combine multiple conditions using AND/OR operators.
Custom Field Visibility

Show forms only when a specific custom field or ACF field matches your rule.
Examples:
- Show a contact form only on posts with
brand = Mercedes. - Hide forms on posts marked “Sold” or “Closed”.
Operators include Equals, Not Empty, >, <, Contains, and more.
URL Parameter Visibility

Control visibility using URL parameters.
Example: https://yourdomain.com/?campaign=summer
You can show a special section only when campaign = summer.
Supports String or Number values.
URL Contains Visibility

Trigger visibility based on URL patterns. Examples:
- Show the form only on URLs containing
/pricing/ - Hide it on URLs containing
/members-only/
These rules help you reuse the same form across multiple pages without showing it everywhere.
Limit Submissions Using Piotnet Addons for Elementor (PAFE)
If you use Piotnet Addons for Elementor (PAFE), you can stop accepting entries after the form reaches a certain number of submissions.
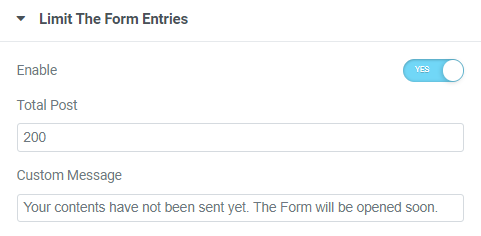
How It Works
- Open the Submit button in Elementor.
- Enable Limit the form entries.
- Enter the maximum number of submissions allowed.
- Add a custom “form closed” message.
PAFE will immediately block new entries once the limit is reached.
Important Notes
- The counter starts after the first successful submission.
- Test submissions count toward the limit.
- There is no way to schedule when counting begins.
- You can increase the limit anytime.
Example: If the current count is 300 and you want 50 more spots, set the limit to 350.
Use OOPSpam for Real Spam Filtering and Rate Limiting
Piotnet Forms does not include built-in spam detection, country blocking, or submission limits. OOPSpam (that’s us 👋) fills these gaps. It adds machine-learning spam filtering, VPN blocking, IP throttling, and country rules directly into WordPress.
This is the only way to limit how many times a user submits a Piotnet form.
How to Install OOPSpam

Step 1 — Install the Plugin
You can install OOPSpam directly from your WordPress dashboard. Open Plugins → Add New and search for OOPSpam Anti-Spam. Install the plugin and activate it.
Step 2 — Connect Your API Key

To connect your API key, create an account on OOPSpam.com and copy the key from your dashboard.

Go back to WordPress and open OOPSpam → General Settings. Paste your API key into the field provided and save your settings.
Step 3 — Enable Piotnet Forms Protection
Make sure the Piotnet Forms spam protection toggle is turned on under General Settings tab. This ensures all Piotnet Forms submissions are checked for spam automatically.

Turn On Rate Limiting (Important)
")
Piotnet cannot limit submission frequency. OOPSpam handles this reliably.
How to Enable Rate Limiting
- Go to OOPSpam → Rate Limiting tab.
- Enable Rate Limiting.
- Set your limits:
-
-
Max submissions per IP per hour – Limits how many times the same IP address can submit in one hour.
-
Max submissions per email per hour – Limits how many times the same email address can submit in one hour.
-
Block duration (hours) – Controls how long an IP or email remains blocked after reaching the limit.
-
Data cleanup schedule (hours) – Sets how often old submission limit data is automatically removed.
-
Click Save Changes.
Add Extra OOPSpam Filters for Better Accuracy
Enable these options for stronger protection:
- VPN & proxy blocking
- Country allow/deny lists
- Language filtering
- Contextual spam detection
- Logs to monitor blocked attempts
These features drastically reduce bot traffic without hurting real users.
Final Takeaway
Piotnet Forms controls who can access your form. OOPSpam controls how and how often users can submit it.
Use Piotnet’s age rules and visibility settings to filter users before they reach the form. Use OOPSpam for advanced spam filtering, country blocking, and rate limiting.
Together, they give you clean submissions, fewer bots, and a safer form experience.
